
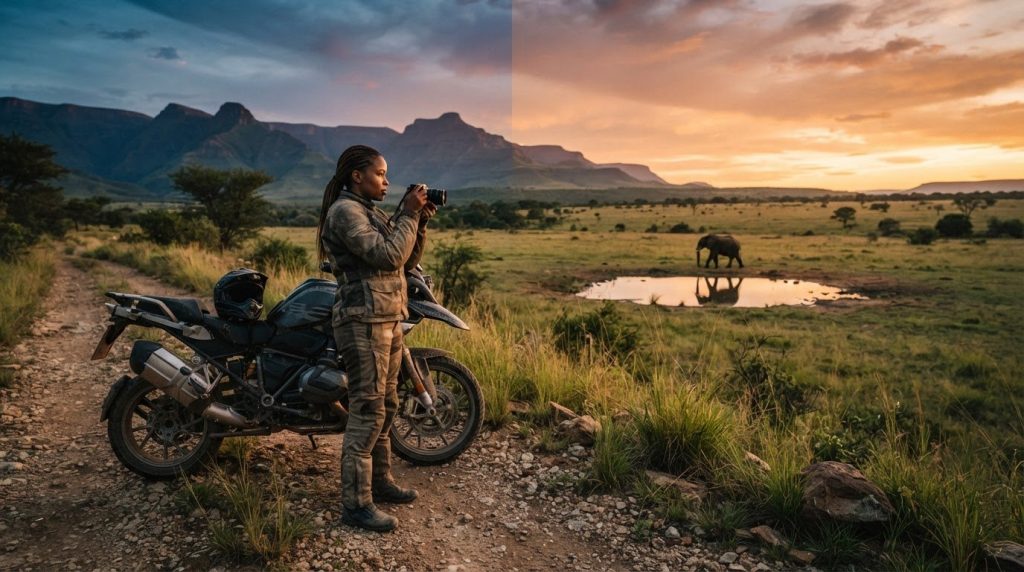
For sharper safari photographs, travel light for quick moments, use a longer lens when wildlife is distant, and choose a 64 GB or larger memory card for a full day in the field. These motorcycle photography tips for safari focus on timing too: frame the subject against a clean background, use softer light around sunrise and sunset, and watch for reflections. Prepare your camera before setting out so you’re ready when the scene changes.
It’s tempting to think the biggest camera always makes the best image, but a compact camera or mobile phone can be handier for candid moments on the move. These motorcycle photography tips for safari will help you choose practical gear, compose cleaner frames, work with changing South African light and plan card capacity. You’ll be ready to capture the journey without letting equipment slow you down.
Key Takeaways
- Keep a compact camera or phone ready for fleeting moments, and practise the settings you’ll use before setting off.
- Separate a subject from visual clutter by adjusting your position and using a wider aperture when available.
- Adapt to the light: soft cloud can flatter a scene, while low angles and reflective surfaces offer fresh ways to compose it.
- Choose memory card capacity to suit your shooting style, and make a simple plan for managing images in the field.
- Small changes in framing, timing and preparation can help your photographs tell a richer story of the ride.
1. Using a compact camera or mobile phone for quick photos
A safari moment can disappear in seconds. A compact camera or mobile phone is often quicker to ready than a large DSLR, making either a handy choice for candid photographs of riders, changing scenery and unexpected wildlife. Keep your device accessible but securely stowed while the motorcycle is moving. Take it out only when safely stopped.
What are the rules for photographing motorcycles and wildlife in South African game reserves? Photograph from authorised roads or stops, follow reserve signs and guide instructions, and never approach or disturb an animal for a better frame. Ask permission before photographing people.
Can motorcycles be ridden in South African national parks and private game reserves? Access depends on each reserve’s rules and designated routes, so don’t assume motorcycles are permitted. On a guided outing, follow the planned route and your guide’s directions.
What camera gear is allowed on guided motorcycle safaris in South Africa? A phone or compact camera, spare battery and securely packed lens are practical choices. Keep equipment stowed while riding, then use it at a safe stop rather than handling a camera on the move.
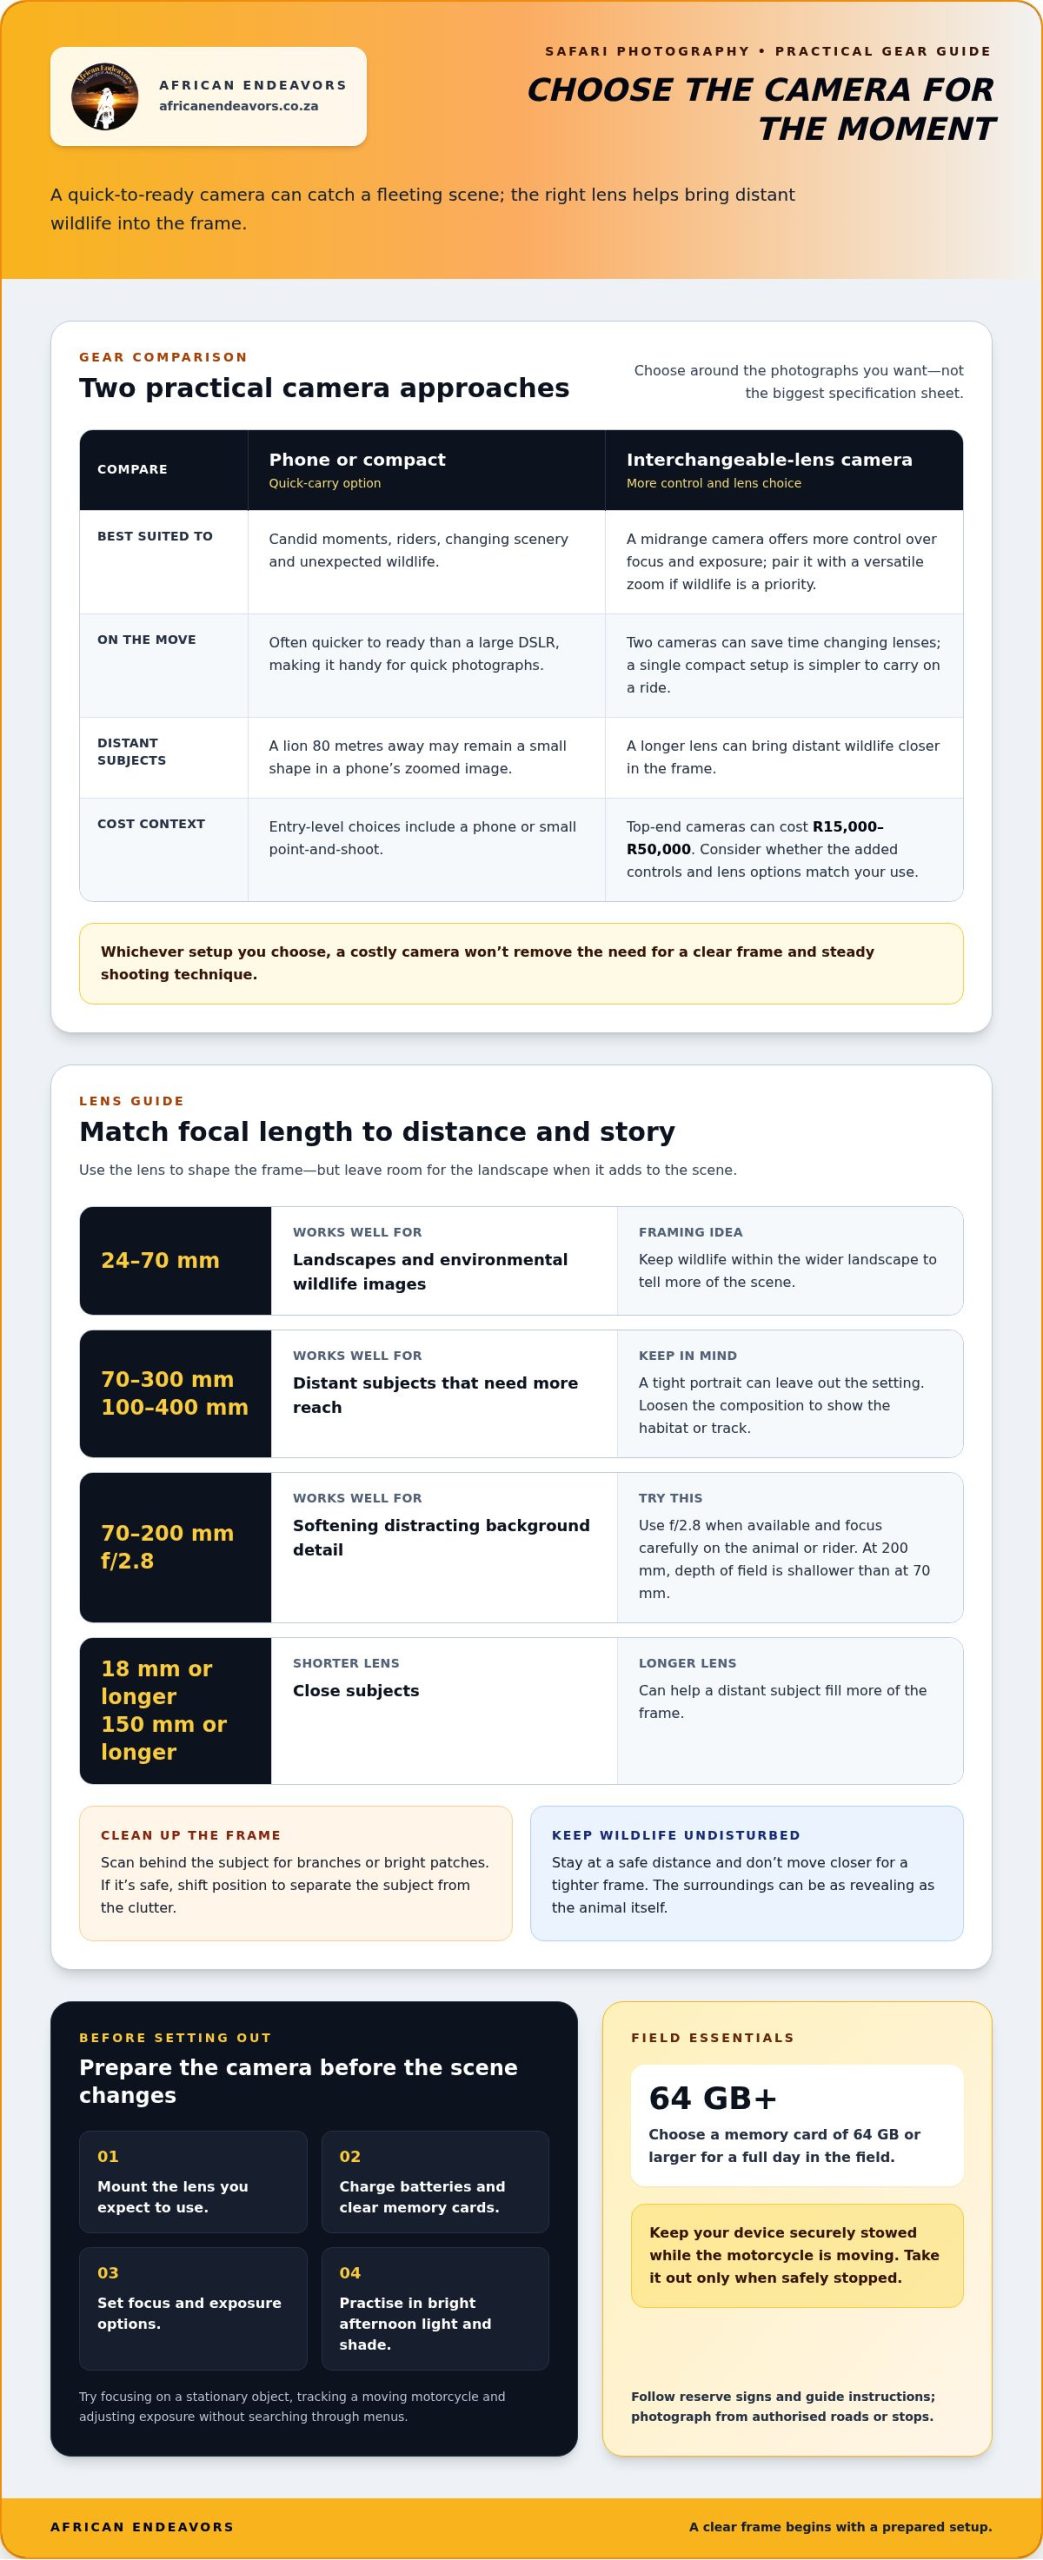
Choose a camera around the photographs you want, not the biggest specification sheet. A 24-70 mm lens suits landscapes and environmental wildlife images, while a 70-300 mm or 100-400 mm lens brings distant subjects closer. A lion 80 metres away, for example, may remain a small shape in a phone’s zoomed image. Two cameras can save time changing lenses, but a single compact setup is simpler to carry on a ride.
Entry-level options include a phone or small point-and-shoot for quick travel photographs. A midrange interchangeable-lens camera offers more control over focus and exposure; pair it with a versatile zoom if wildlife is a priority. Top-end cameras can cost R15 000 to R50 000, so consider whether their added controls and lens options match your use. A costly body won’t remove the need to choose a clear frame and steady shooting technique.
How do you capture sharp motorcycle action shots while panning? Select shutter-priority mode, start tracking the motorcycle before pressing the shutter, and rotate smoothly with its movement. Take a short burst, then check whether the bike is sharp against a softened background.
How do you safely position yourself to photograph motorcycles and wildlife? Stay in the permitted area and take photographs from a safe, stationary position. Let your guide direct where you stop, and never step towards wildlife for a lower angle.
What are the risks of photographing motorcycles near wildlife, and how can they be reduced? Noise, movement or getting too close can disturb animals and change their behaviour. Keep your distance, follow your guide’s instructions, and don’t interfere with a hunt or other wildlife activity.
Prepare before leaving camp: mount the lens you expect to use, charge batteries, clear memory cards and set your focus and exposure options. Practise those settings before travelling, in both bright afternoon light and shade. Try focusing on a stationary object, tracking a moving motorcycle and adjusting exposure without searching through menus. Rehearsing makes it easier to shoot deliberately when the road, light or wildlife changes.
2. Choosing uncluttered backgrounds and shallow depth of field
A clean background gives a wildlife subject room to stand out. Before shooting, scan behind the animal for branches, bright patches or other distractions, then shift position if it’s safe. Even a small change in angle can move a tree trunk away from an animal’s head or separate a motorcycle from dense foliage. These motorcycle photography tips for safari start with seeing the whole frame, not just the subject.
A wide aperture can soften distracting detail behind your subject. With a 70-200 mm f/2.8 lens, try f/2.8 when available, then focus carefully on the animal or rider. At 200 mm, the lens creates shallower depth of field than at 70 mm, which can help isolate a subject against a distant background. Check the whole frame, though: a soft background won’t remove objects that overlap the subject.
Match focal length to distance and story. A lens of 150 mm or longer can help a distant subject fill more of the frame, whilst a shorter lens of 18 mm or longer suits close subjects. For a wide environmental portrait, include the motorcycle and surrounding landscape; for a detail such as a rider’s gloved hand on the handlebar, step closer only when it’s safe. A 24-70 mm zoom can also frame landscapes with wildlife within the scene.
Long telephoto lenses bring distant wildlife closer in the frame, but they can encourage tight portraits that leave out the setting. Try a 300 mm lens when you need more reach, then loosen the composition to show the animal’s habitat or a motorcycle approaching along the track. Keep enough distance that your presence doesn’t alter wildlife behaviour. On a safari, the surroundings can be as revealing as the animal itself.
The seasons change the mood of an African landscape. During the dry season, wildlife is often easier to see around waterholes, where the background may be clearer and activity more concentrated. The green season is often considered favourable for wildlife photography, with fewer visitors and softer light. Compose around what’s actually in front of you: a striking moment may need space around the subject, not a tighter crop.
Try a simple sequence: frame the scene wide, move to a medium view, then make a close portrait if the subject remains undisturbed. Compare where the background falls in each version. This practical approach to motorcycle photography tips for safari helps you decide when the rider or animal should dominate, and when the landscape deserves more space. For a South African ride through changing landscapes, explore motorcycle safari journeys as inspiration for the scenes you might want to photograph.
3. Making the most of golden-hour and overcast light
Light reshapes a South African landscape throughout the day. Early morning sunlight can reveal texture on a gravel track, while long shadows give a motorcycle more presence. Before shooting, notice where the light falls: a rider facing the sun may squint, while side light can bring out the contours of a helmet, jacket or fuel tank. Use the available light to tell the story instead of expecting every scene to look the same.
Bright afternoon sun can flatten a photograph. For example, an elephant against a green bush at 4pm may lack visual drama unless the animal is doing something. Look for a gesture, movement or clear interaction with the landscape. If the subject is stationary, shift your framing to include a striking patch of light or shadow. A 300 mm lens can isolate a distant detail, but check whether a wider frame better explains the scene.
Golden-hour light rewards patience. At sunrise or near sunset, watch how the colour and direction of the light change across the road, vegetation and wildlife. Choose a safe, stationary viewpoint, compose your frame, then wait for a rider or animal to enter the light. A silhouette can work when the background is bright and recognisable: expose for the sky and let the subject’s outline carry the image. Keep the sun outside the frame if flare obscures important detail.
Overcast conditions offer a different advantage. Clouds soften harsh contrast, helping retain detail in pale fur, dark clothing and motorcycle bodywork. Use the even light to capture colour and texture, then find contrast in the scene itself, such as a dark rider against open sky. In South Africa’s green season, softer light and fewer visitors can make wildlife photography appealing. Lush vegetation also gives images a richer, layered background.
Check exposure when clouds move across the sun. A setting that worked in bright light may leave a shaded subject too dark, so review the image and adjust before the moment passes. Watch reflective surfaces, too: a polished tank can catch bright highlights, while a visor may mirror the sky. If the motorcycle is safely parked, turn it slightly to control those reflections.
Keep the landscape in mind as light changes. A 300 mm lens can bring a distant animal closer, but a wider view may show how morning mist, cloud or late sunlight shapes the setting. Take a close frame and an environmental frame when time allows. These two perspectives make a stronger set of images, showing both the detail and the atmosphere of a ride through changing light.
4. Low-angle and reflection compositions
A low viewpoint can make a motorcycle feel powerful against an open South African landscape. From a safe, stationary position, bring the camera closer to the ground and include the track, grasses or sky around the subject. Keep yourself and your equipment inside the permitted area, and never move towards wildlife for a better angle. A low frame works best when the foreground leads naturally towards the rider or animal.
Use the motorcycle’s lines to guide your composition. Position the front wheel near a lower corner, then leave space in front of the bike to suggest its direction of travel. If the rider is approaching, avoid placing the headlight against a busy background. A slight shift can separate the helmet from branches or distant rocks, while a little foreground adds depth.
Reflections offer another way to organise a frame. Still water can mirror a motorcycle, animal or clouded sky, adding a second visual layer beneath the subject. Look for calm water from a safe viewpoint, then lower the camera until the reflection is clear in the frame. If ripples break up the image, wait for the surface to settle or use them to suggest movement.
Polished surfaces can create smaller reflections in the field. A motorcycle mirror, visor or tank may catch the surrounding landscape, but bright highlights can distract from the main subject. Check the edges of the frame and shift position to change what appears in the reflection. Keep reflected details secondary unless they add a clear part of the story, such as a rider’s eye behind a visor.
Shutter speed shapes how movement appears. For moving animals, use 1/1000 second or faster to help freeze action. To suggest motion in a passing motorcycle, track the rider smoothly through the viewfinder and take a short burst; review the result afterwards. A general guideline is to use at least a shutter speed matching one divided by the lens focal length. With a 400 mm lens, that means aiming for 1/400 second to reduce camera shake.
Stability matters at low angles. When photographing on foot, use a tripod; inside a safari vehicle, a beanbag can support the camera. At a wildlife sighting, turn off the vehicle’s engine when appropriate and keep a respectful distance. Focus on the animal’s eyes where visible, and don’t interfere with a hunt to get a cleaner reflection or more dramatic viewpoint. A strong composition respects the subject as well as the frame.
5. Memory card capacity for field photography
A card that fills before the ride ends can interrupt a valuable sequence. For safari photography, choose a memory card of 64 GB or more; if you’ll be out in the field all day, a 64 GB or 128 GB card is a practical option. The right capacity depends on file size and shooting habits, especially whether you capture RAW files, JPEGs, video or long bursts. These motorcycle photography tips for safari start with matching card space to the way you shoot.
Check the camera’s remaining-card display before setting off. Then consider the day ahead: a landscape stop may call for a few deliberate frames, while a passing motorcycle or moving animal can prompt repeated bursts. RAW files preserve more editing information but take up more space than JPEGs. Video also uses capacity quickly, so avoid long clips unless they add something to the story.
Prepare your card before travelling. Transfer existing images to a separate storage device, then format the card in the camera you’ll use. Formatting removes files, so first confirm that any photographs you want to keep have been copied. Check that the camera recognises the card and displays its available capacity before packing. For motorcycle photography tips for safari, this simple preparation helps keep your camera ready for the day’s changing scenes.
Build a simple backup routine around the day’s itinerary. At camp, copy the day’s images to a laptop and an external drive, then check that the files open. Leave the memory card unchanged until both copies are verified. If you carry more than one card, store used and unused cards separately, so a quick swap doesn’t put your only copy at risk.
Be selective during quiet moments, not during a wildlife encounter. A burst of nearly identical frames can use up card space and create a long sorting task later. After a drive, review a sequence and keep the strongest image, perhaps the motorcycle entering a bend or an animal looking towards the camera. This leaves more room for the next destination without making you miss a fleeting moment.
Guides help shape the day’s pace, but your shooting style determines how quickly you use card capacity. A photographer taking occasional JPEGs needs less space than someone recording video and shooting RAW bursts. Before departure, match card capacity to your approach, carry a prepared spare if you have one, and make image backups part of your end-of-day routine.
Ready to pair the camera with a route through South Africa’s wild landscapes? Explore guided motorcycle safari tours and plan a journey worth capturing.
African Endeavors: The Wild Coast & Drakensberg Tour
The Wild Coast & Drakensberg Tour from African Endeavors is a natural next step if you want to experience these landscapes on a guided motorcycle journey. Instead of focusing only on individual photographs, you can ride through changing scenery and look for moments that bring the road, rider and surroundings together.
Choose a guided motorcycle safari when you’d like the route and riding experience to shape the adventure, while you focus on photography from safe stops. African Endeavors also offers the Kruger Park & Panorama Route Tour and the Garden Route & Route 62 Tour, as well as Off-Road Dirt Bike Safaris. Each offers a different setting for capturing South Africa’s distinctive landscapes.
To explore a guided ride through the Wild Coast and Drakensberg, visit africanendeavors.co.za.
Let the next ride shape the story
A photograph can preserve more than a striking view. It can bring back the anticipation before a bend, the changing character of the road and the feeling of being immersed in South Africa’s vast landscapes. Let your next ride give those images a story beyond the frame. Choose a route for the experience you want, then make room to notice the unexpected details along the way.
African Endeavors offers The Wild Coast & Drakensberg Tour, The Kruger Park & Panorama Route Tour and The Garden Route & Route 62 Tour. Each offers a distinct setting for a journey shaped by open roads and remarkable scenery. If you’re ready to turn your interest in motorcycle photography into a ride through South Africa, explore the tours and contact African Endeavors to discuss your next adventure.
Carry your curiosity with you. The most memorable frame may be the one you didn’t plan.
Frequently Asked Questions
What camera settings work best for photographing motorcycles on safari?
For a fast-moving motorcycle, use continuous autofocus and burst mode to track the rider across several frames. To freeze movement, use a fast shutter speed; for a panning effect, move the camera smoothly with the bike and review the result. Set exposure before the action begins, then adjust if the rider moves from bright sunlight into shade. Practise these controls before travelling.
What lenses and camera gear are best for safari motorcycle photography?
A versatile zoom is useful when the distance between you and the subject changes quickly. A 24-70 mm lens can capture the motorcycle within its surroundings, while a telephoto lens helps frame distant wildlife without moving closer. A spare battery and a secure bag also help during a long day out. Choose equipment you can handle comfortably from a stationary, safe viewpoint.
How can you protect a camera from dust, rain, and vibration on safari?
Keep the camera in a closed, padded bag while travelling, and take it out only when safely stopped. In dusty conditions, avoid changing lenses in the open: find a sheltered spot and point the camera body down during the change. A rain cover can help shield equipment from showers. After a bumpy stretch, inspect the camera and lens before shooting again.
What is the best time of day and lighting for motorcycle photography on safari?
Early morning and late afternoon often bring softer, warmer light that reveals texture in a motorcycle and the surrounding landscape. Overcast skies also diffuse harsh sunlight, helping preserve detail across bright paintwork and shaded areas. In South Africa’s green season, softer light can suit wildlife photography. Notice how the light falls on the rider, then adjust your position to avoid distracting glare.
